Showing posts with label DIY. Show all posts

Friday, December 11, 2015

Succulents In Old Cans

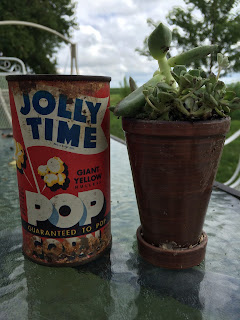
My mom and I went “pickin” a couple years ago and got these old cans from an old merchant store. When I picked up some succulents at half price I knew just what I wanted to plant them in!

 After a gentle cleaning, I sprayed them with a clear matte spray paint to help seal them up from further rust.
Because they are rusting inside I didn’t want to plant directly in them and expose them to more moisture. I used 2 little flower pots I had already and cut off the bottom of a juice container. I pull these out when I water the plants.


There were miscellaneous pieces that had broken off during planting and I put those in another container to root. 

Growing Pumpkins


As my favorite season has come to an end and the color has fallen from the trees, I feel it’s time to recap October and this year’s garden. Last year I purchased a number of pumpkins and gourds from various places and saved the seeds to plant this spring. This was my first attempt at saving seeds and I’m happy to report they all grew! We had about 12 orange pumpkins and a dozen small striped pumpkins.


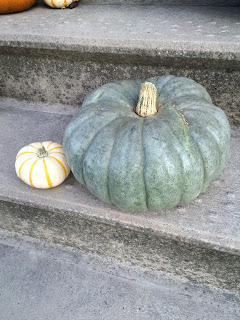
 My 2 two favorite pumpkins! 


Turks Turban Squash! 


 Flower pots got re-purposed after the flowers were done! 

 I wasn't ready to put away the wash tubs yet, so they got some pumpkins and sunflowers!


This year I went to an apple orchard with a friend and while she picked apples, I picked up a few new beauties. Prices ranged from $2-5 dollars each and I knew that I would get way more seeds this way rather than ordering seeds online, plus I get the benefit of enjoying the pumpkins this fall.

Porcelain Doll Pumpkins
 I don't have a great photo of the one I got, but I took a photo of each type and name at the orchard so that I could remember all the variations of each pumpkin. 

Peanut Pumpkin

Long Island Cheese & One Too Many

Cinderella
Its not like I have a favorite or anything!

One special pumpkin got to be Iowa State's mascot for trunk-or-treat! 


I can't wait to see what we will harvest next fall!!!

Saturday, November 23, 2013

Owl Pillows


A while back I got the pattern for these adorable owls from Just Another Hang Up. I love all things owls and these were too cute not to make! I made mine out of flannel that I got at Joann’s on Black Friday and stuffed them with fiber fill. I think the next one I make will be rice filled for heating up on cold winter days.

Silent Night Holy Night Pillows


It’s beginning to look a lot little like Christmas. Christmas preparation has started and these pillows were at the top of my list.
 
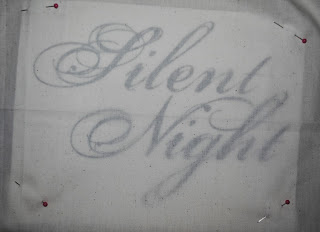
Using Photoshop I printed my text (Porcelain font at 300pt) then pinned it to my linen fabric that I purchased at Joann’s (with a 40% off coupon).  

 
I then traced the text with an Ultra Fine Point Sharpie filling in smaller areas as I went. After filling it all in I used a regular Sharpie and went over the larger areas to make sure it was thoroughly colored. I ironed the back of the fabric to set it after I was done. I finished up my pillows by sewing them into envelope style covers and inserted my pillow forms.
 

These were super easy and a great start to the Christmas season! I’m thinking of doing a few more with other Christmas songs or phrases. Any suggestions?  

Friday, October 25, 2013

Antique School Desks with Chalkboard Tops

A couple summers ago I got these two antique school desks at a garage sale and started working on sanding down the top, but the weather got cold and I never finished them. This time when I pulled them out of the basement I set out to finish them! I bought chalkboard spray paint at Hobby Lobby (using a 40% off coupon), for the legs I used black gloss paint, and to seal the wood I used leftover polyurethane from another project.


Using a fine grit sand paper I took what sealer was left off the desk top and seat. As you can see these were definitely desks used by children. One has more wear and tear than the other but I think it shows the history of the desk. After taping off the top of the desk I applied a few thin layers of the chalkboard paint. I was concerned how the chalkboard would do on some of the deeper grooves, but after sanding they weren’t quite as deep.

After using a wire brush to removed any loose particles from the rusty areas I then applied Rust-Oleum’s Gloss Protective Enamel. I think it looks great and will prevent any more damage to the beautiful scroll work.
I applied two coats of poly to seal up the wood and love that I got a darker finish without having to stain it. I’m so happy with the way the desks turned out! Now I just need to find small metal cups to put in the ink well holes to hold chalk. Anyone have any ideas?

Thursday, October 24, 2013

Pinspiration - DIY Tablet Holder


I use my HP Tablet a lot in the kitchen when trying out new recipes (from Pinterest of course) and can never find the right place to set it up. After finding a tutorial on Mamie Jane’s I decided to make one myself. I like the cutting board idea for the kitchen but I also want to use it in my craft room, so when I came upon this chipboard plaque ($3.99 & 40% off) at Hobby Lobby I thought it would be a perfect substitute.

 
I used scrap wood I found in the garage to make the stand and ledge. To assemble I used wood glue and small finishing nails. Originally I had painted the plaque Valspar’s La Fonda Ortiz Gold and then used Valspar’s Perfect Storm to make a chevron pattern, but it turned out to sloppy, so I painted the entire thing Perfect Storm. I wanted some contrasting color so I left the ledge Gold. After assembling, I painted the stand and touched up spots that needed it.
 
I like the way it looks and think it will do the job, but I think that if I were to make it again I would look for a plaque that could be flush with the stand. Because if its shape, the point is longer than the curved edges and therefore can’t add support to the stand.  Using a cutting board would definitely make it more stable. Maybe I’ll check Goodwill for a cutting board and make another holder to keep in the kitchen and leave this one in the craft room.